BPM Detection
Tempi listens to the audio around it and reports the tempo in real time. BPM detection begins as soon as you press the record button and, after a brief warm-up period, will start reporting tempos. How quickly it starts reporting (and how stable those readings are) depends on the Responsiveness setting — higher values take a bit longer to lock on but produce more accurate results, while lower values respond faster at the cost of some stability.
Here are some tips for getting the best results with BPM detection:
- If the reported tempo is much higher or lower than you expect, tap the 1x button in the top right corner. It will cycle between 1x, 2x, and ½x. At 1x, the reported tempos are usually between 70 and 140. So at 2x they’re between 140 and 280, and at ½x they’re between 37 and 70. See Range Multiplier for more details.
- Tempi works best when there’s a distinct “pulse” to the music. Clear, steady rhythms like those from a drumbeat, strumming guitar, or consistent piano chords help Tempi detect the tempo accurately. If the music is very fluid or lacks a strong beat, results may be less reliable.
- Tempi makes an effort to remain consistent with the tempos it reports. If there are multiple candidate BPMs at any given time, it will prefer the one that more closely matches previously reported BPMs. For this reason, if possible, it can be helpful to start your performance with a “count-off” (e.g. drumsticks, muted guitar strums, claps, or even a clearly defined beat) before continuing.
- If background noise or other instruments are interfering with tempo detection, positioning your device closer to the primary rhythm source can improve accuracy. For the most accurate readings, place your device on a stable surface where it can clearly pick up the beat. Avoid holding it too close to low-frequency sources (like a bass amp) if the beat is coming from another instrument. Know where your device microphone is and point the mic toward the music.
- Tempi works well for a variety of musical styles, but some genres with complex polyrhythms or rubato (like jazz, classical, or freeform improvisation) may give varying results. Experimenting with the 1x/2x/½x setting can help.
- Tempi defaults to a using a low-pass filter for analysis, but in situations where there are hardly any bass frequencies, a high-pass fitler might be better. You can change the filter from Settings or from DJ mode.
- In professional setups where the utmost accuracy is required, consider using a high-quality external microphone.
Modes: Musician & DJ
Tempi has two modes designed for different use cases: Musician and DJ. Each mode is basically a screen with its own UI and controls. You can switch between them using the arrow buttons on either side of the screen. Tempi remembers which mode you last used and will open to that mode the next time you launch the app.
Musician Mode
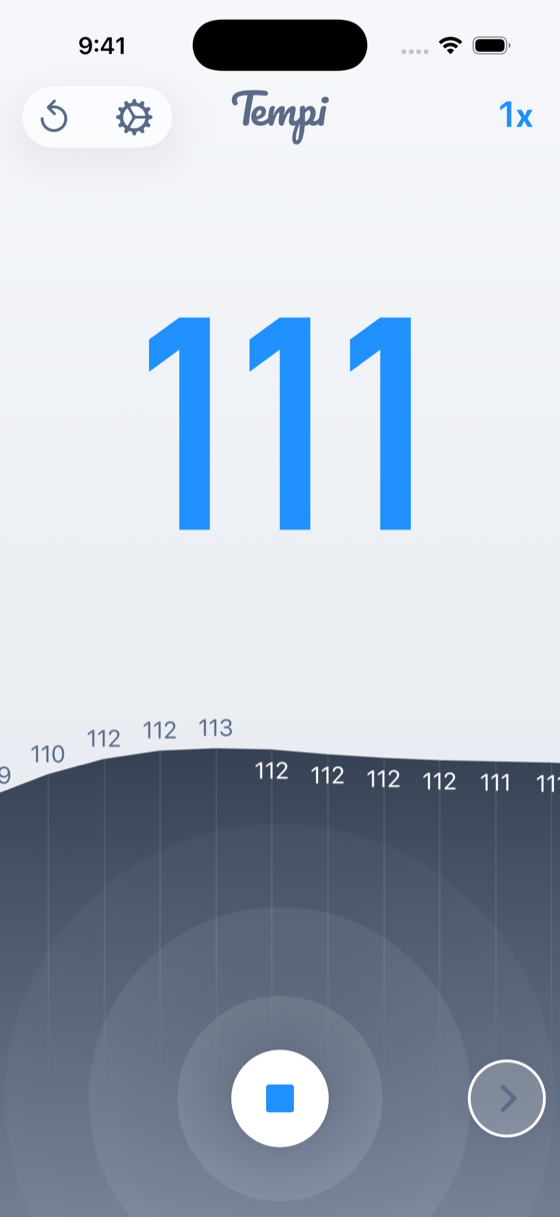
Musician mode is designed for practicing, rehearsing, and performing. Its interface is focused on a single song or session, with a clean display that puts the current BPM front and center.
When you tap the record button, Tempi begins listening and displays the detected BPM in large text at the center of the screen. A tempo graph scrolls across the top, showing how the BPM fluctuates over time. This gives you a real-time visual sense of whether you’re staying on tempo or drifting.
Recording
Post-Analysis
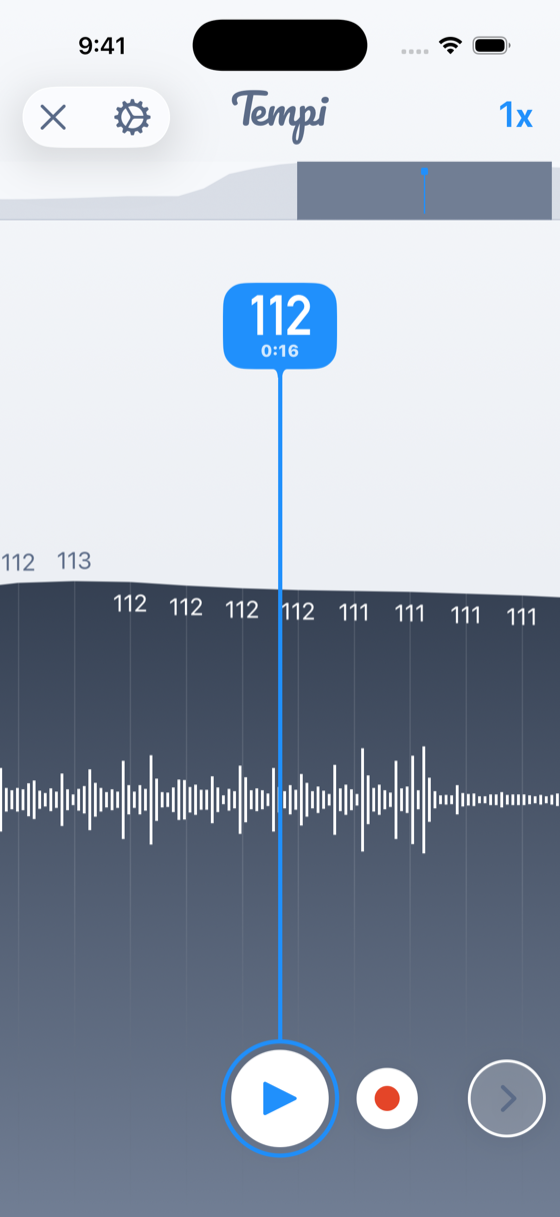
Tempi records your performance so you can review it once you’re done. After stopping the recording, you’ll see a detailed graph of how the BPM changed over the entire session, along with a waveform of the audio. You can scrub through the timeline to pinpoint exactly where you or your band sped up or slowed down — a powerful tool for improving your rhythm over time.
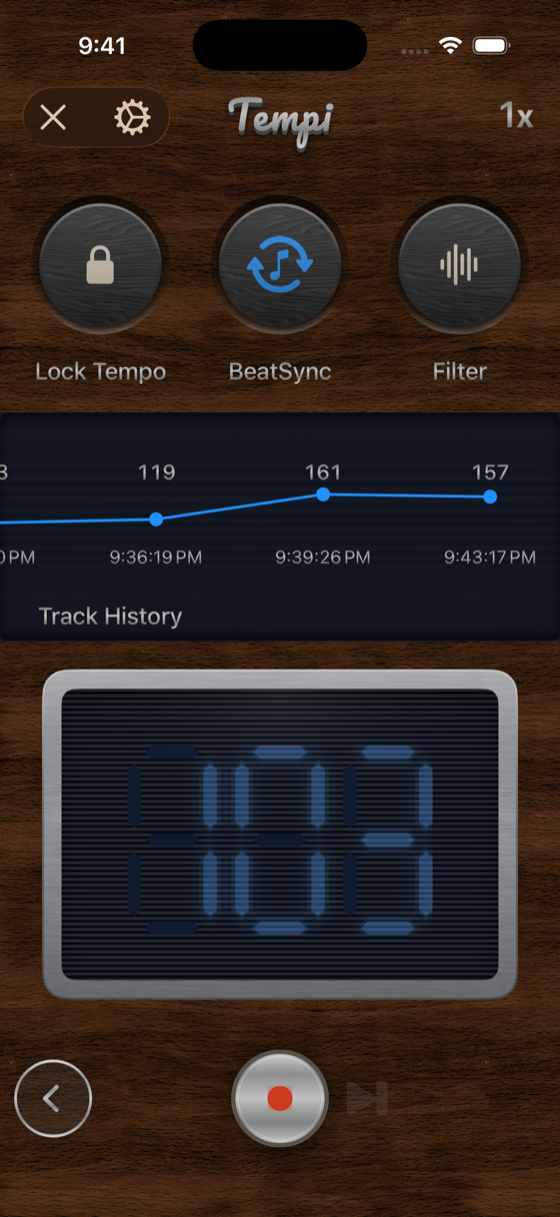
DJ Mode
DJ mode is designed for mixing and live sets. Unlike Musician mode, which focuses on a single song, DJ mode is built around the concept of a set — multiple tracks played in sequence. It provides tools for tracking your set over time and gives you access to BeatSync, a powerful tool for syncing external devices to the beat of the music.
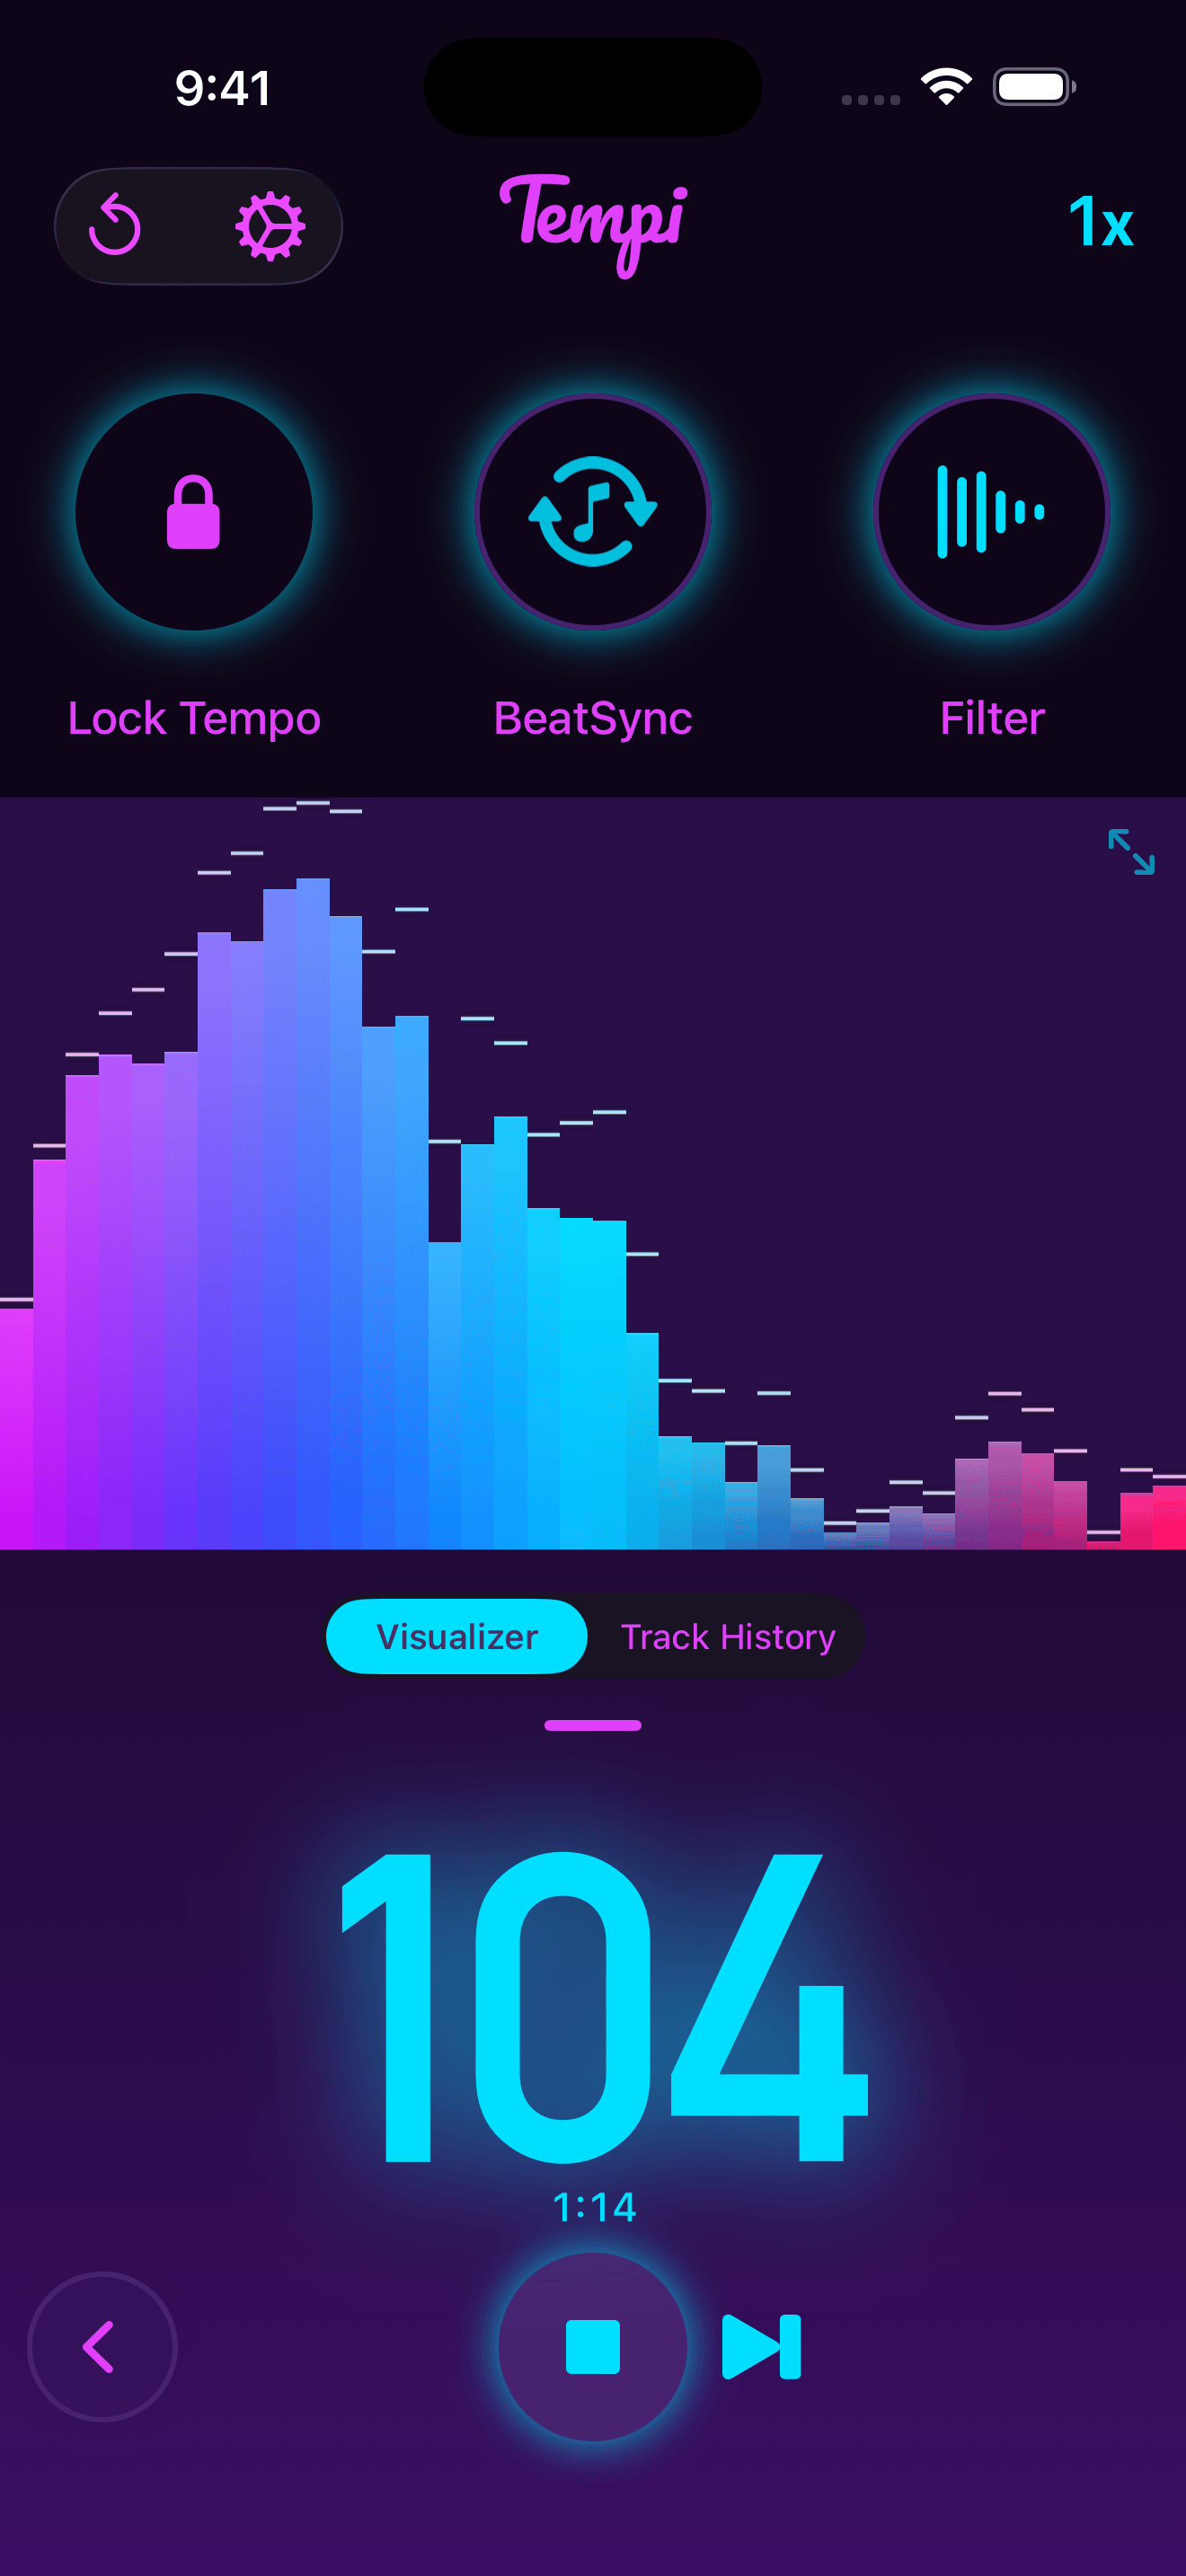
The first screenshot above shows a graphic EQ for visualizing where the frequencies of the music predominantly fall. This can help you decide whether a low-pass or high-pass filter would work best. It also just looks really cool, so I made sure to give it a full screen option for when you just want to show it off 😻
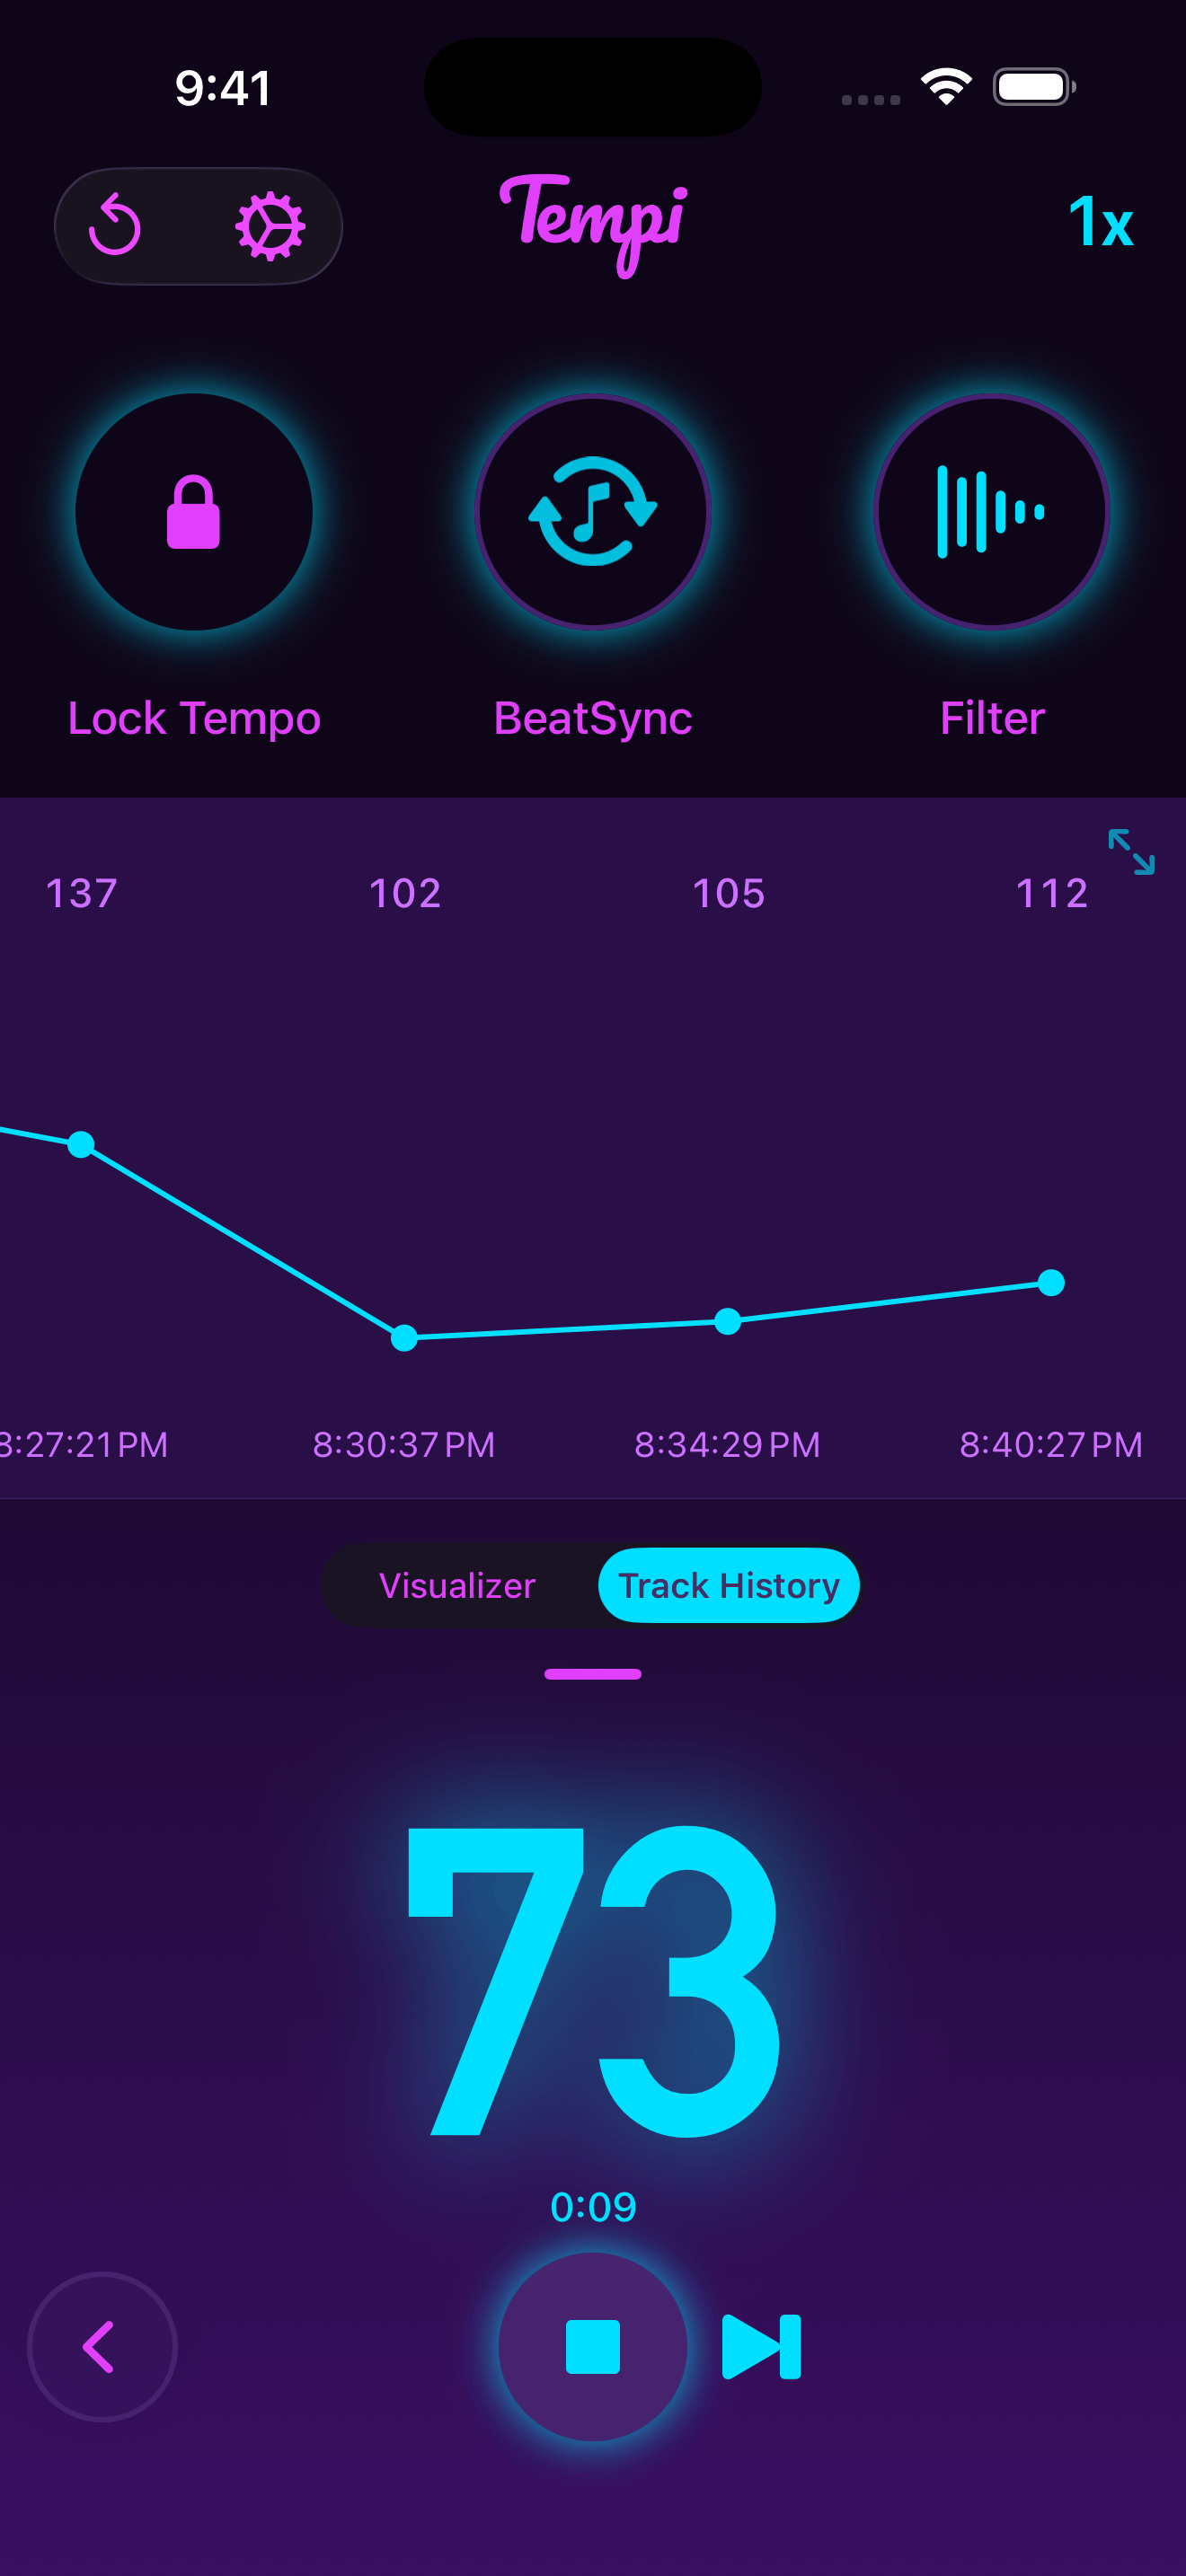
The second screenshot above shows the Track History, a graph of the BPM of each track you’ve played, so you can see how the energy in your set is building (or dropping) over time. Each track appears as a segment on the graph with its average BPM labeled.
To mark the beginning of a new track, tap the next track button (the skip-forward icon to the right of the stop button). This starts a fresh detection session and adds a new segment to the graph. Stopping and restarting the recording also creates a new track in the track history. The elapsed time for the current track is displayed above the play button.
DJ mode also exposes several controls that aren’t available in Musician mode:
- Lock Tempo — Freezes the displayed BPM and any BeatSync actions at the current tempo, regardless of what’s playing. This can be useful if you want to lock in a target tempo and use Tempi as a reference point.
- BeatSync — Tap to expand a set of actions that sync to the detected beat, including screen flash, vibrate, and Ableton Link. See the BeatSync section for full details.
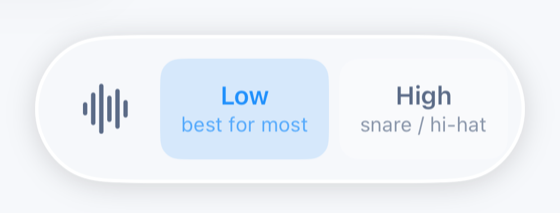
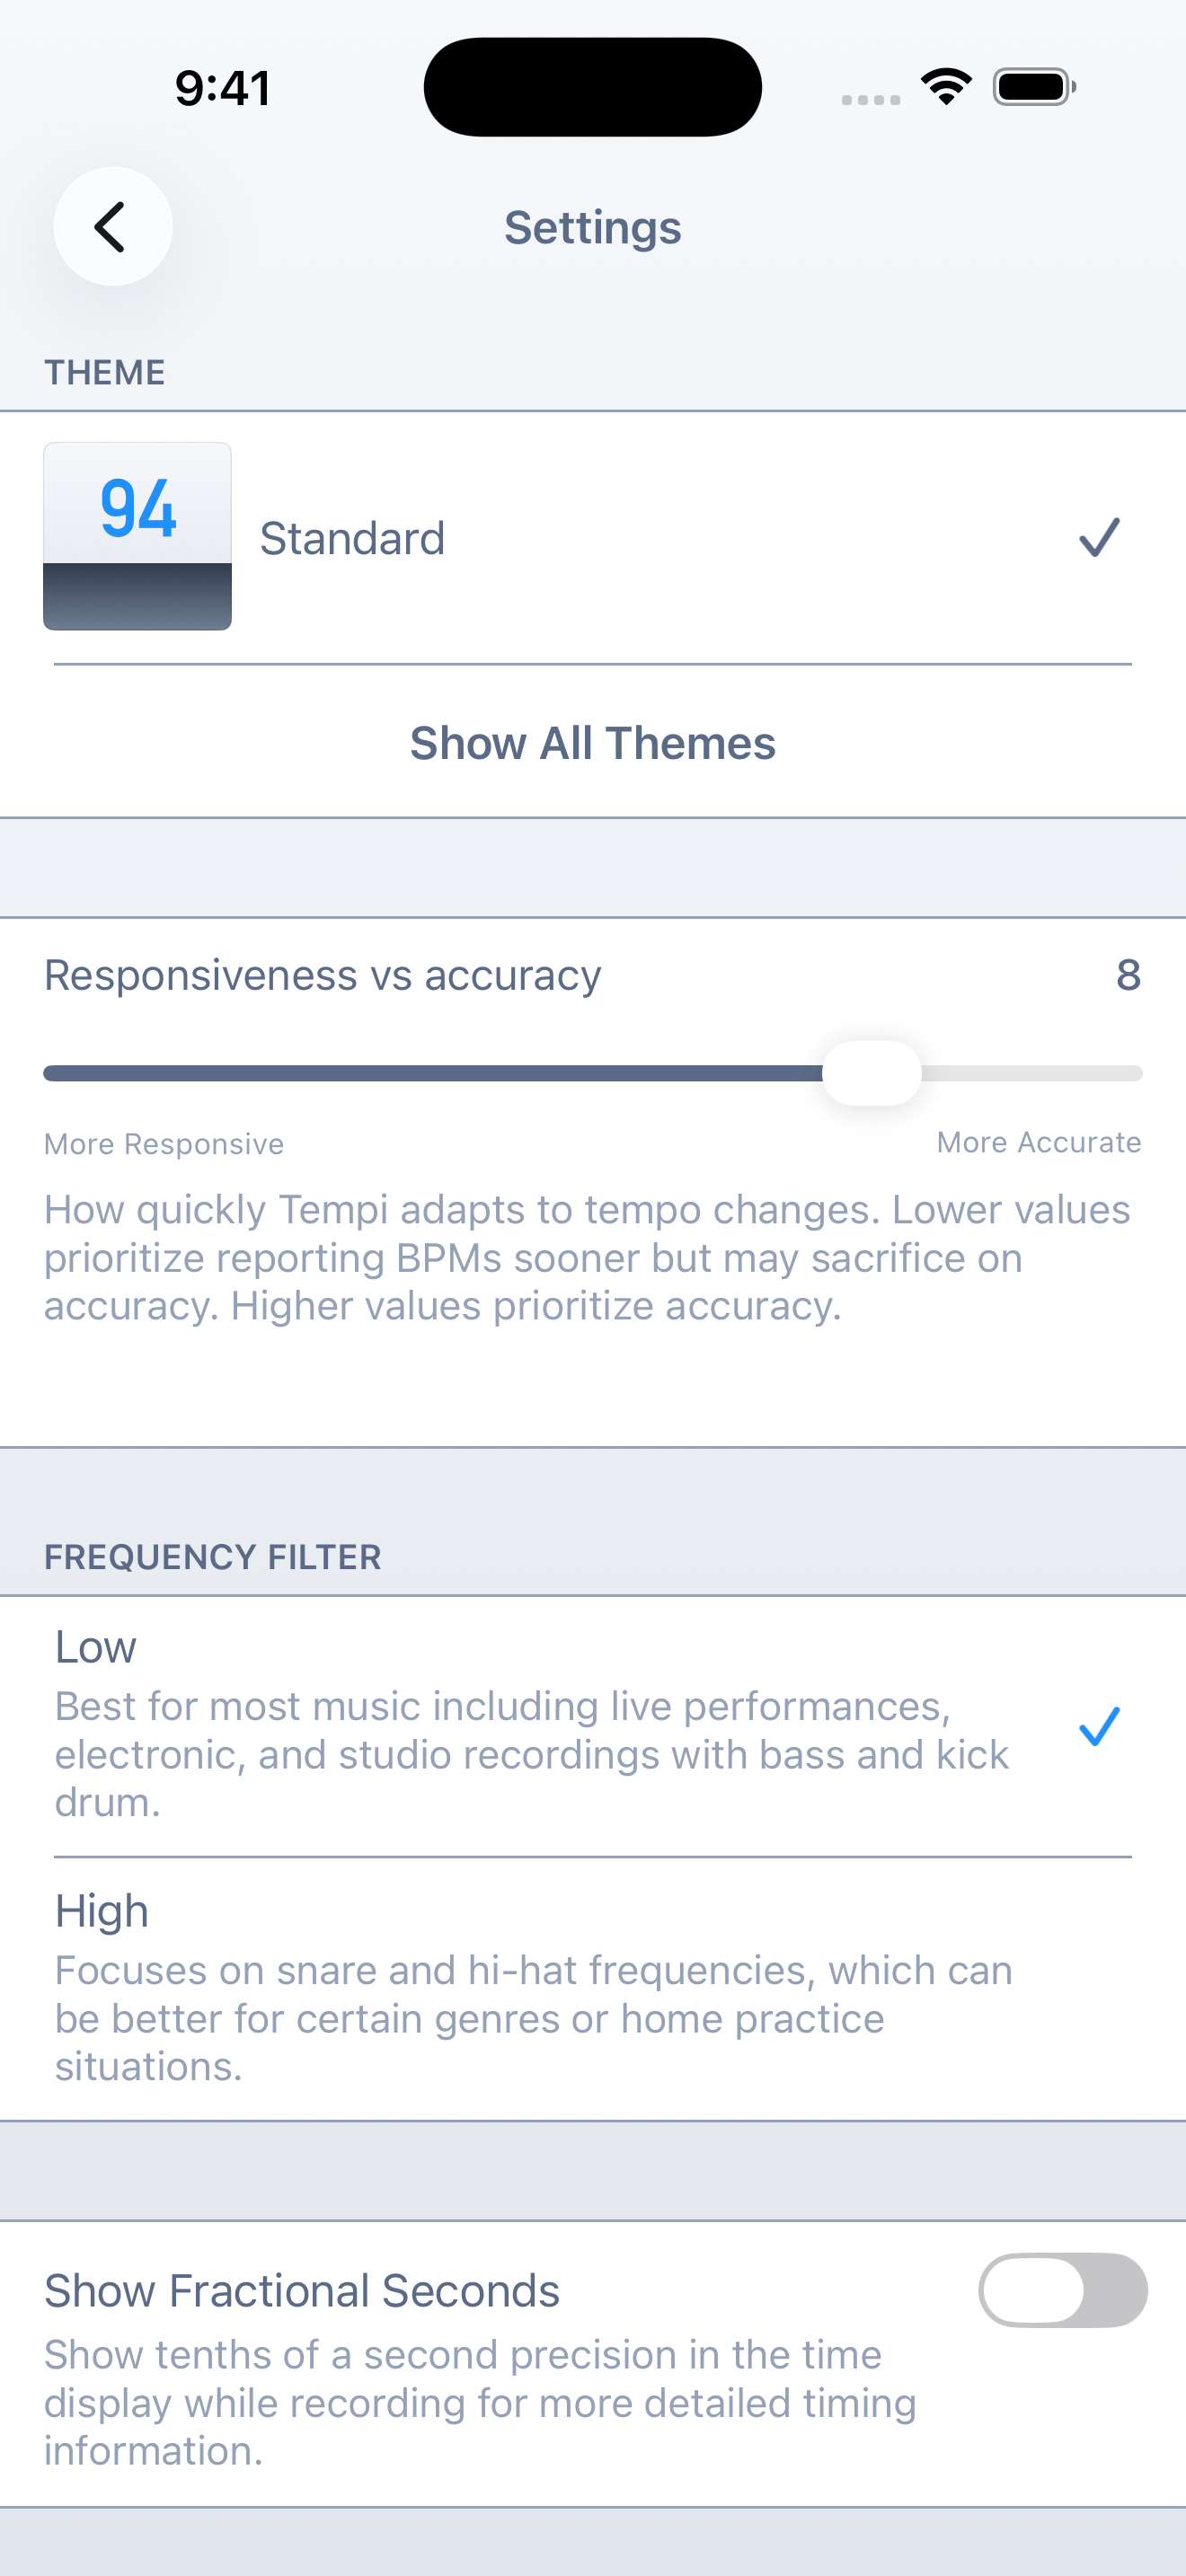
- Filter — Switches between Low and High frequency filtering for beat detection. Low (the default) works best for music with a bass and/or kick drum. High focuses on snare and hi-hat frequencies, which can be better for certain genres or home practice situations.
BeatSync
BeatSync is a set of actions that trigger in sync with the beat that Tempi detects. It’s available in DJ mode via the BeatSync capsule button at the top of the screen. Tap it to expand and reveal the available actions — you can enable any combination of them at once.
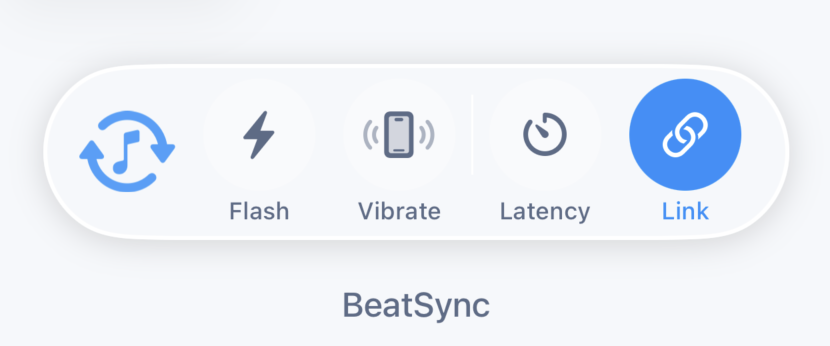
The available BeatSync actions are:
- Flash — The screen flashes on each detected beat. This provides a quick visual confirmation that Tempi is locked onto the rhythm, and can also serve as a visual metronome.
- Vibrate — The device vibrates on each beat. This is great for situations where you can’t hear a click or see the screen. For example, if your device is in your pocket during a performance. (Available on iPhone only.)
- Link — Connects Tempi to Ableton Link, allowing it to broadcast tempo and beat timing to other Link-enabled apps and devices on the same network. See the Ableton Link section under Settings for details on how to configure it.
For the best results with BeatSync:
- Since BeatSync requires good tempo information, all of the suggestions in the above BPM Detection section apply to BeatSync too.
- Minimize noise (crowd noise, chatter, etc) in the recording environment.
- The source music should have a consistent “pulse” like a kick, snare, or high-hat.
- Choose the low-pass filter for bass/kick heavy music; use the high-pass filter when the snare or hi-hat are the most consistent.
- The source music should have a relatively stable tempo. Avoid songs with wild BPM swings.
- When a new song starts, tap/click the next track button so that a fresh detection session can begin.
- Use the ½x / 2x multipliers if necessary to dial in the right tempo multiple.
- Avoid songs that are in odd time signatures. 4/4 and 3/4 work best.
- Set the responsiveness slider to at least 7.
Live Activity
When Tempi is actively detecting tempo, it displays a Live Activity on your Lock Screen and in the Dynamic Island (on supported devices). This means you can see the current BPM at a glance without opening the app — handy during performances or DJ sets when you want to keep your attention on the music.
The Live Activity shows the current BPM in large text, along with the current status (warming up, listening, or actively tracking a beat). You can also tap the range multiplier button directly from the Live Activity to cycle between ½x, 1x, and 2x without switching back to the app.
Range Multiplier
Tempi’s BPM detection operates within a specific range, and the range multiplier button (displayed in the top right corner of the screen) lets you shift that range to match the music you’re working with. Tap it to cycle through three settings:
- ½x — Reports tempos between 37 and 70 BPM. Use this for very slow music, ballads, or half-time feels.
- 1x — Reports tempos between 70 and 140 BPM. This is the default and covers most popular music, rock, pop, hip-hop, and more.
- 2x — Reports tempos between 140 and 280 BPM. Use this for fast genres like drum and bass, bebop, speedcore, or when you want double-time readings.
If the BPM Tempi is showing seems like it’s half or double what you’d expect, the range multiplier is usually the fix. It’s also available from the Live Activity on your Lock Screen.
Settings
Tempi’s settings let you customize how the app looks, behaves, and responds to the music. Tap the gear icon in the top left corner to open Settings.
Themes
Tempi comes with a variety of visual themes. Some are designed for general use, while others — like Nighttime Red and Pitch — are specifically designed for low-light situations like nighttime performances or dark DJ booths, keeping the screen dim so it doesn’t distract you or your audience.
The Vinyl theme deserves a special mention — it features a highly customized skeuomorphic design with a completely unique look and feel.
Responsiveness vs accuracy
The responsiveness vs accuracy slider controls how quickly Tempi adapts to tempo changes, on a scale from 1 to 10. Lower values prioritize speed — Tempi reacts to changes quickly, but may be less accurate in noisy or complex musical situations. Higher values prioritize accuracy and stability — Tempi will take a bit longer to adjust but will give you more reliable readings.
Show Fractional Seconds
When enabled, this adds tenths-of-a-second precision to the time display while recording. This gives you more detailed timing information during your session, which can be useful for short recordings or precise timing work.
Ableton Link
Ableton Link is a technology that keeps apps and devices in sync over a shared network. When enabled in Tempi, it allows Tempi to broadcast the detected tempo to any other Link-enabled app or device on the same Wi-Fi network — including Ableton Live, hardware synths, and dozens of other music apps.
This means Tempi can effectively act as a tempo leader: it listens to live audio, detects the BPM, and pushes that tempo out to your entire setup automatically.
Full list of Link-enabled devices.
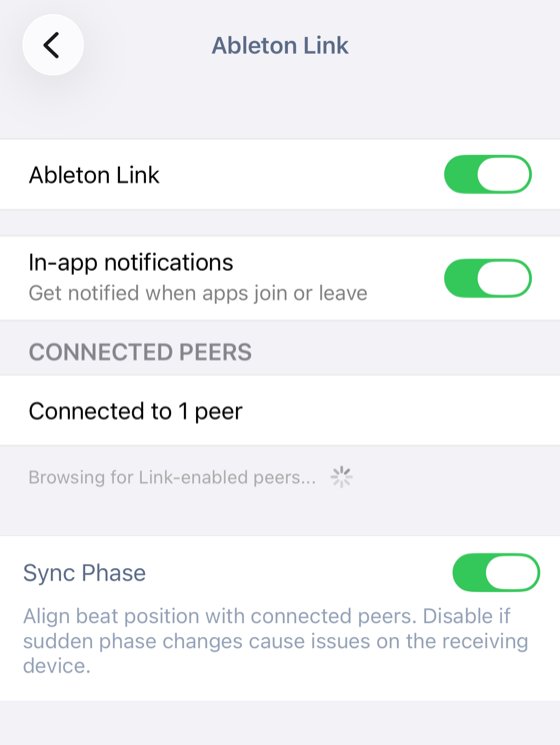
The Ableton Link settings screen shows you how many peers are currently connected and provides the following options:
- Ableton Link — Enables or disables Link. When enabled, Tempi will appear as a peer to other Link-enabled apps on your network.
- In-app notifications — Get notified when other apps join or leave the Link session.
- Sync Phase — When enabled, Tempi aligns its beat position with connected peers, so that beats land at the same time across all devices. Disable this if sudden phase changes cause issues on the receiving device.
Support
Need more help or have feedback? I’d love to hear from you.
(Pro tip: if you contact me from within the app you can choose to include your last recording session which can be very helpful!)