Getting Started
Quartz is an audio recorder for iPhone, built for those who want their recordings to sound better than what the stock recorder apps give them. The idea is simple. You tell Quartz a little about where you are by choosing a preset, like Concert, Voice, or Field, and it sets up the right sound processing for that situation. Press record and you get a clean, great sounding file.
It’s meant to feel familiar if you’ve used Voice Memos, while giving you room to grow when you want more control. A few things worth knowing up front:
- Everything you record and every effect you apply is non-destructive. Your original audio is always kept safe, and you can change your mind at any time. You can even switch presets after a recording is finished.
- Quartz keeps your recordings on your iPhone. There’s no account to create, and nothing is uploaded to a server. What you record stays with you unless you choose to share it.
- Quartz is a recorder, not a multitrack studio or a place to publish songs. It does one job, capturing great sound, and gives you the everyday tools to trim, organize, and share what you record.
The home screen at a glance
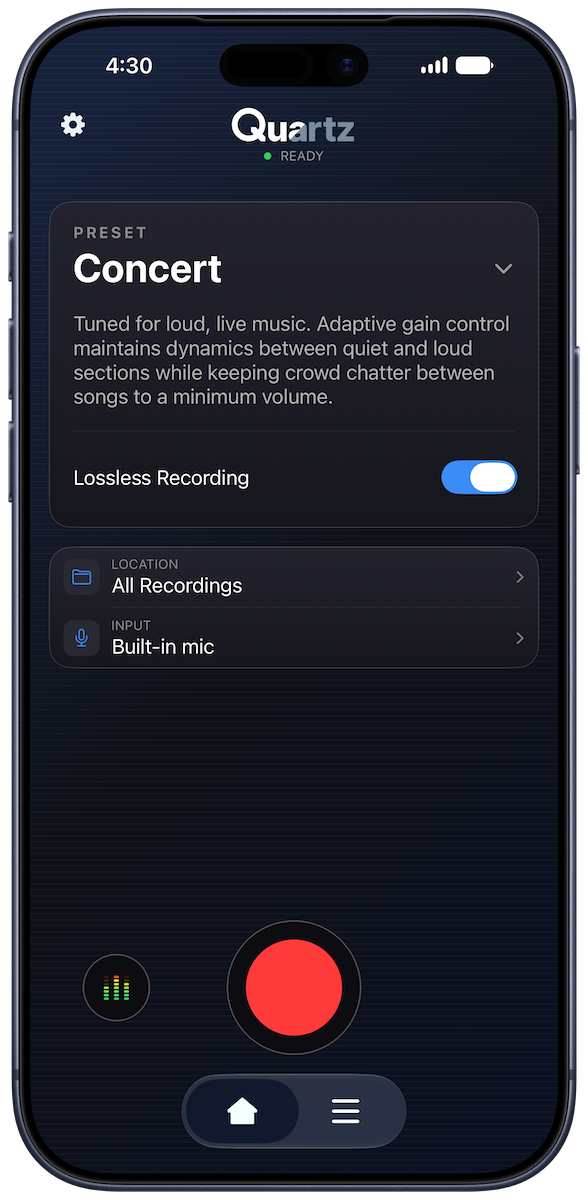
The home screen is where you start. At the top you’ll see the active preset and a card showing its main settings. Tapping the preset name lets you pick a different one. The big record button takes you to the recording screen, and the Library is where all your finished recordings live.
Making your first recording
Recording takes three steps:
- Choose a preset that matches your situation. If you’re not sure, Voice is a great default for speech and Concert is great for music.
- Tap the record button and start your recording. The screen shows a live meter and a moving spectrum display so you can see that sound is coming in.
- Tap stop when you’re done. Your recording is saved automatically.
Finding your recording afterward
Finished recordings are saved to your Library and given a name based on the date and time. Open the Library from the home screen to play, rename, edit, organize, or share anything you’ve recorded. If you record a lot, the Organizing Files section covers folders and search.
Presets
A preset is the heart of how Quartz works. Instead of asking you to know about microphones and audio settings, Quartz bundles all of that into a single choice. You pick the preset that describes your surroundings, and it quietly configures the whole recording chain to sound its best in that setting.
The built-in presets
Quartz comes with a set of presets that cover most situations:
- Voice — Talking, interviews, voice notes, and lectures. Tuned to make speech clear and to keep background noise down.
- Concert — Live music, loud rooms, and shows. Set up to handle high volume without distorting.
- Rehearsal — Band practice and jam sessions where you want a faithful capture of the room.
- Field — Recording out in the world, from nature to street sounds to events.
- Studio — Quieter, controlled spaces where you want the cleanest possible capture.
- iOS Default — Hands the processing over to iOS, so it sounds much like Voice Memos. This is also the preset to use when you want stereo from the iPhone’s built-in mic. See the FAQ for when to reach for it.
- Flat — No extra processing at all. Quartz records exactly what the microphone hears, which is handy when you want full control later.
If you’re not sure which to use, start with the one whose name matches what you’re doing. You can always change your mind, and because recording is non-destructive, you can even switch the preset after the fact from a recording’s edit controls.
Choosing and switching presets
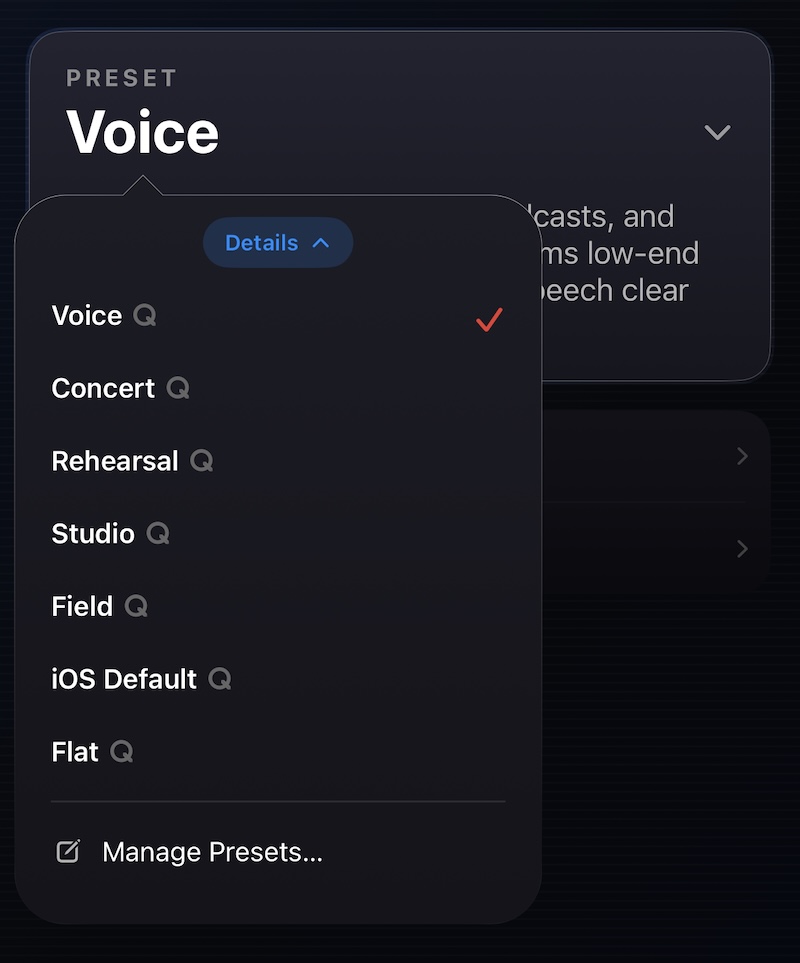
Tap the preset name on the home screen to see the full list and pick another. The card below it updates to show what that preset does. This is all most people ever need to touch.
What’s inside a preset
Every preset is really a collection of settings. You don’t have to think about any of these to get a good recording, but they’re here when you want to look under the hood or build a preset of your own. From simplest to most technical:
Sound quality and file format
A preset decides how much detail your recording keeps and what kind of file it saves. Higher settings sound better and take up more space. There are two families of file:
- Compressed (m4a) — Smaller files that are perfect for voice notes and sharing. You can choose the quality level. This is the friendly everyday choice.
- Lossless (wav or caf) — Keeps every bit of detail with no compression, at the cost of larger files. Use it when quality matters most, for example music you plan to edit later. Quartz records lossless up to 24-bit and 48 kHz.
Related to this are the sample rate (how many times per second the sound is measured), the number of channels (mono or stereo), and the bit depth (how finely each measurement is stored). Higher numbers mean more detail and bigger files. If those terms are new to you, don’t worry, the built-in presets already pick sensible values, so you can leave them alone.
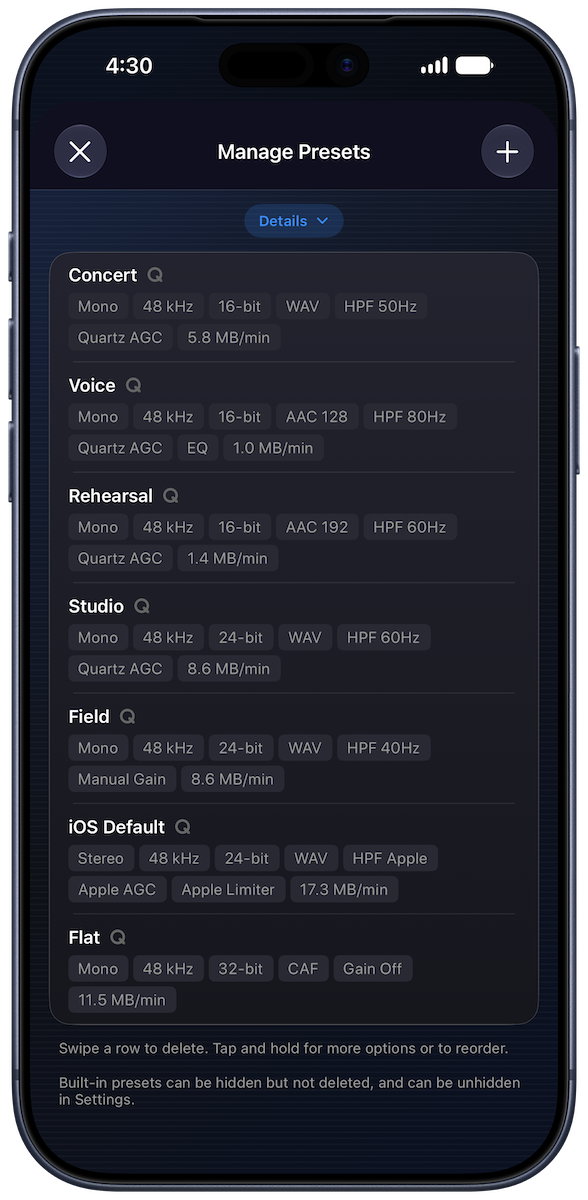
To see how much space a preset uses, check its data rate, shown in megabytes per minute. Both the preset picker (tap Details) and the Manage Presets screen list it for every preset, so you can tell at a glance how quickly a recording will add up.
Input gain
Input gain is how loud the incoming signal is before it’s recorded. Set it too low and your recording is faint. Set it too high and loud moments distort. Quartz can handle this for you automatically, or you can take manual control with a fader on the recording screen. There’s more on this in the Recording section.
High-pass filter
A high-pass filter removes very low rumble, the kind of low frequency noise that comes from wind, handling the phone, or air conditioning. Some amount of HPF is almost always desirable so unless you’re recording a rocket launch, leave it on! Most presets turn this on by default.
Peak limiter
The peak limiter is a safety net for volume. If a sudden loud sound comes in, the limiter gently holds it back so it doesn’t distort. It’s especially useful for live music and unpredictable environments.
Different settings for different inputs
A single preset can behave differently depending on what you’re plugged into. For example, it might use one set of settings for the built-in mic and another for an external USB microphone. Quartz handles this switch for you, so a preset always makes sense for whatever you’re recording with at the moment.
Making your own preset
When the built-in presets aren’t quite what you want, you can build your own. Open Manage Presets from Settings. The easiest way to start is to duplicate a built-in preset that’s close to what you want and adjust from there, which saves you setting everything up from scratch. Tweak any of the settings above, give it a name, and it appears right alongside the built-in ones on the home screen.
From the same screen you can also reorder presets to put your favorites first, edit the ones you’ve made, and hide any built-in presets you never use to keep the list tidy. Hidden presets are never deleted, and you can bring them back at any time.
Recording
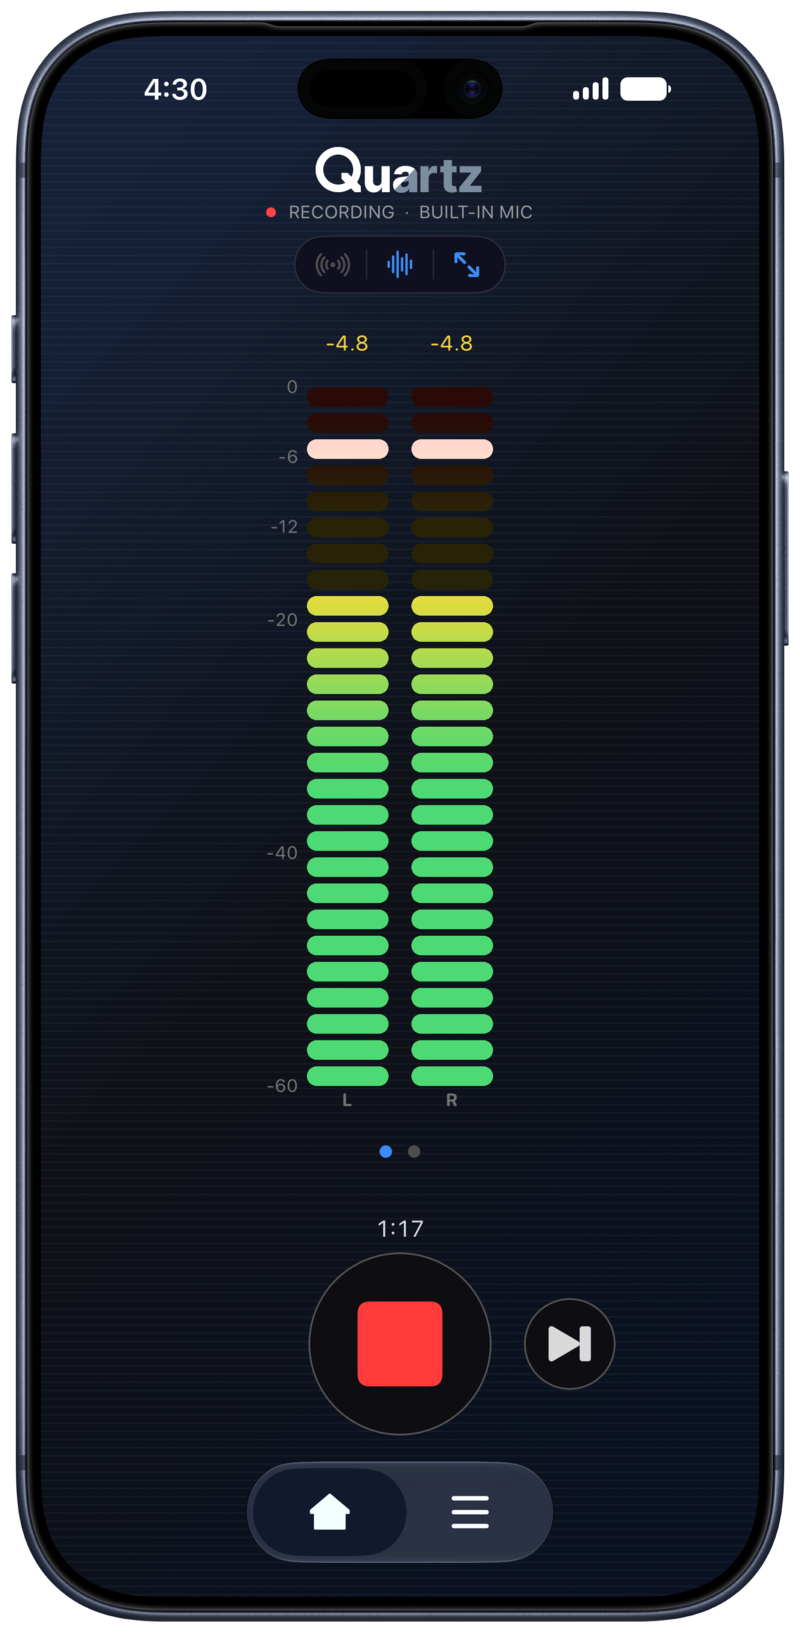
The recording screen is where you capture sound. It shows a live view of what’s coming in, along with controls for starting, stopping, and splitting your recording. Pick your preset first, then press record.
Choosing your input
Quartz records from your iPhone’s built-in microphone by default. If you connect another input, such as a USB microphone or an audio interface, you can select it as the source. Quartz shows you which inputs are available and warns you if the one you chose can’t honor every setting in the current preset.
Good to know: when a preset uses Quartz’s own sound processing, recordings from the built-in mic are mono. To do that processing cleanly, Quartz captures a single channel from one built-in mic. If you want stereo from the built-in mic, switch to the iOS Default preset, which hands processing over to iOS. See the FAQ for details. External mics and interfaces can record in stereo with any preset.
The level meter
While recording, a level meter shows how loud the incoming sound is. With most presets you don’t need to manage this yourself. Quartz’s automatic gain keeps the level in a good range as things get louder and quieter, and the peak limiter catches sudden loud moments so they don’t distort. When the limiter steps in, an indicator lights up to let you know. The meter is mostly there for reassurance, so you can see at a glance that sound is coming in and sitting at a healthy level.
Checking levels before you record
The small levels button beside the record button on the home screen opens the recording screen with the meters live but recording not yet started. It’s a chance to see how loud things are and get set up before you commit. This is especially handy with manual input gain, since you can dial in the gain against the live meter first and then start recording once it looks right. When you’re ready, tap record. To back out without recording, just leave the screen.
The spectrum display
Next to the meter is a real-time spectrum display, a row of bars that dance to the frequencies in the sound. It’s a lively way to confirm that audio is coming through, and it looks great too. Tap it to expand into a full-screen view.
Recording more than one take
You don’t have to stop and start over to begin a new file. Tap Next Track while recording and Quartz closes the current file and immediately begins a fresh one, without missing a beat. This is perfect for capturing several songs in a set or several takes in a row as separate recordings.
Input monitoring
When you’ve got headphones connected, whether wired, Bluetooth, USB, or AirPlay, a toggle in the top bar lets you monitor the live signal. This pipes what the microphone hears straight to your headphones so you can check your sound as you record. It only appears when headphones are connected, since monitoring through the phone’s own speaker would cause feedback.
Expect a little delay between the sound in the room and what you hear in your headphones. Some latency is normal for input monitoring on a phone, and it’s more noticeable over Bluetooth than with wired headphones.
Setting the input level yourself
By default Quartz manages your recording level automatically, adjusting as the sound gets louder or quieter so you don’t have to think about it. If you want full control, you can switch to manual gain and set the level with a fader right on the recording screen. Only the built-in Field preset uses manual gain.
Hands-free and remote control
Sometimes you can’t reach the screen. Quartz gives you a few ways to start and stop without touching your phone:
- AirPods and Bluetooth remotes — A press on a connected AirPod or Bluetooth media remote works the record button for you.
- Volume buttons — With the setting turned on, your iPhone’s volume buttons (or a camera or tripod remote that uses them) can start and stop recording while Quartz is open.
- Live Activity — While you record, a Live Activity appears on your Lock Screen and in the Dynamic Island, so you can see that recording is running and control it without opening the app.
You can choose what a remote press does in the middle of a recording, either stopping it or starting a new track. That option lives in Settings under Remote Control.
Skipping accidental taps
If you tend to start recordings by accident, Quartz can automatically throw away very short ones for you. Turn on Discard Short Recordings in Settings and pick a threshold, such as one or two seconds. Anything shorter than that is dropped when you stop, which keeps your Library free of stray clips.
Editing
Editing in Quartz never changes your original recording. Every effect and edit is applied on top of a safe, untouched copy, and you can change or remove any of it later. Think of it like the negative from a film camera. The capture is preserved, and everything you do is a print you can always redo.
Because of this, you’re free to experiment. Try an effect, change a setting, come back a week later and adjust it again. Nothing you do closes the door on anything else.
Open a recording from your Library to reach its playback and editing screen. Every tool below lives there.
Trim, Cut, and Split
Open the trim editor from a recording’s screen to work with a full-screen waveform of your audio. Drag the handles to select a region, then choose what to do with it:
- Trim keeps the part between the handles and removes everything outside it. Use it to shave silence off the start and end.
- Cut removes the part between the handles and joins the two remaining sides together. Use it to take out a mistake or a gap in the middle.
- Split divides one recording into two separate files at the point you choose. Use it to break a long recording into pieces.
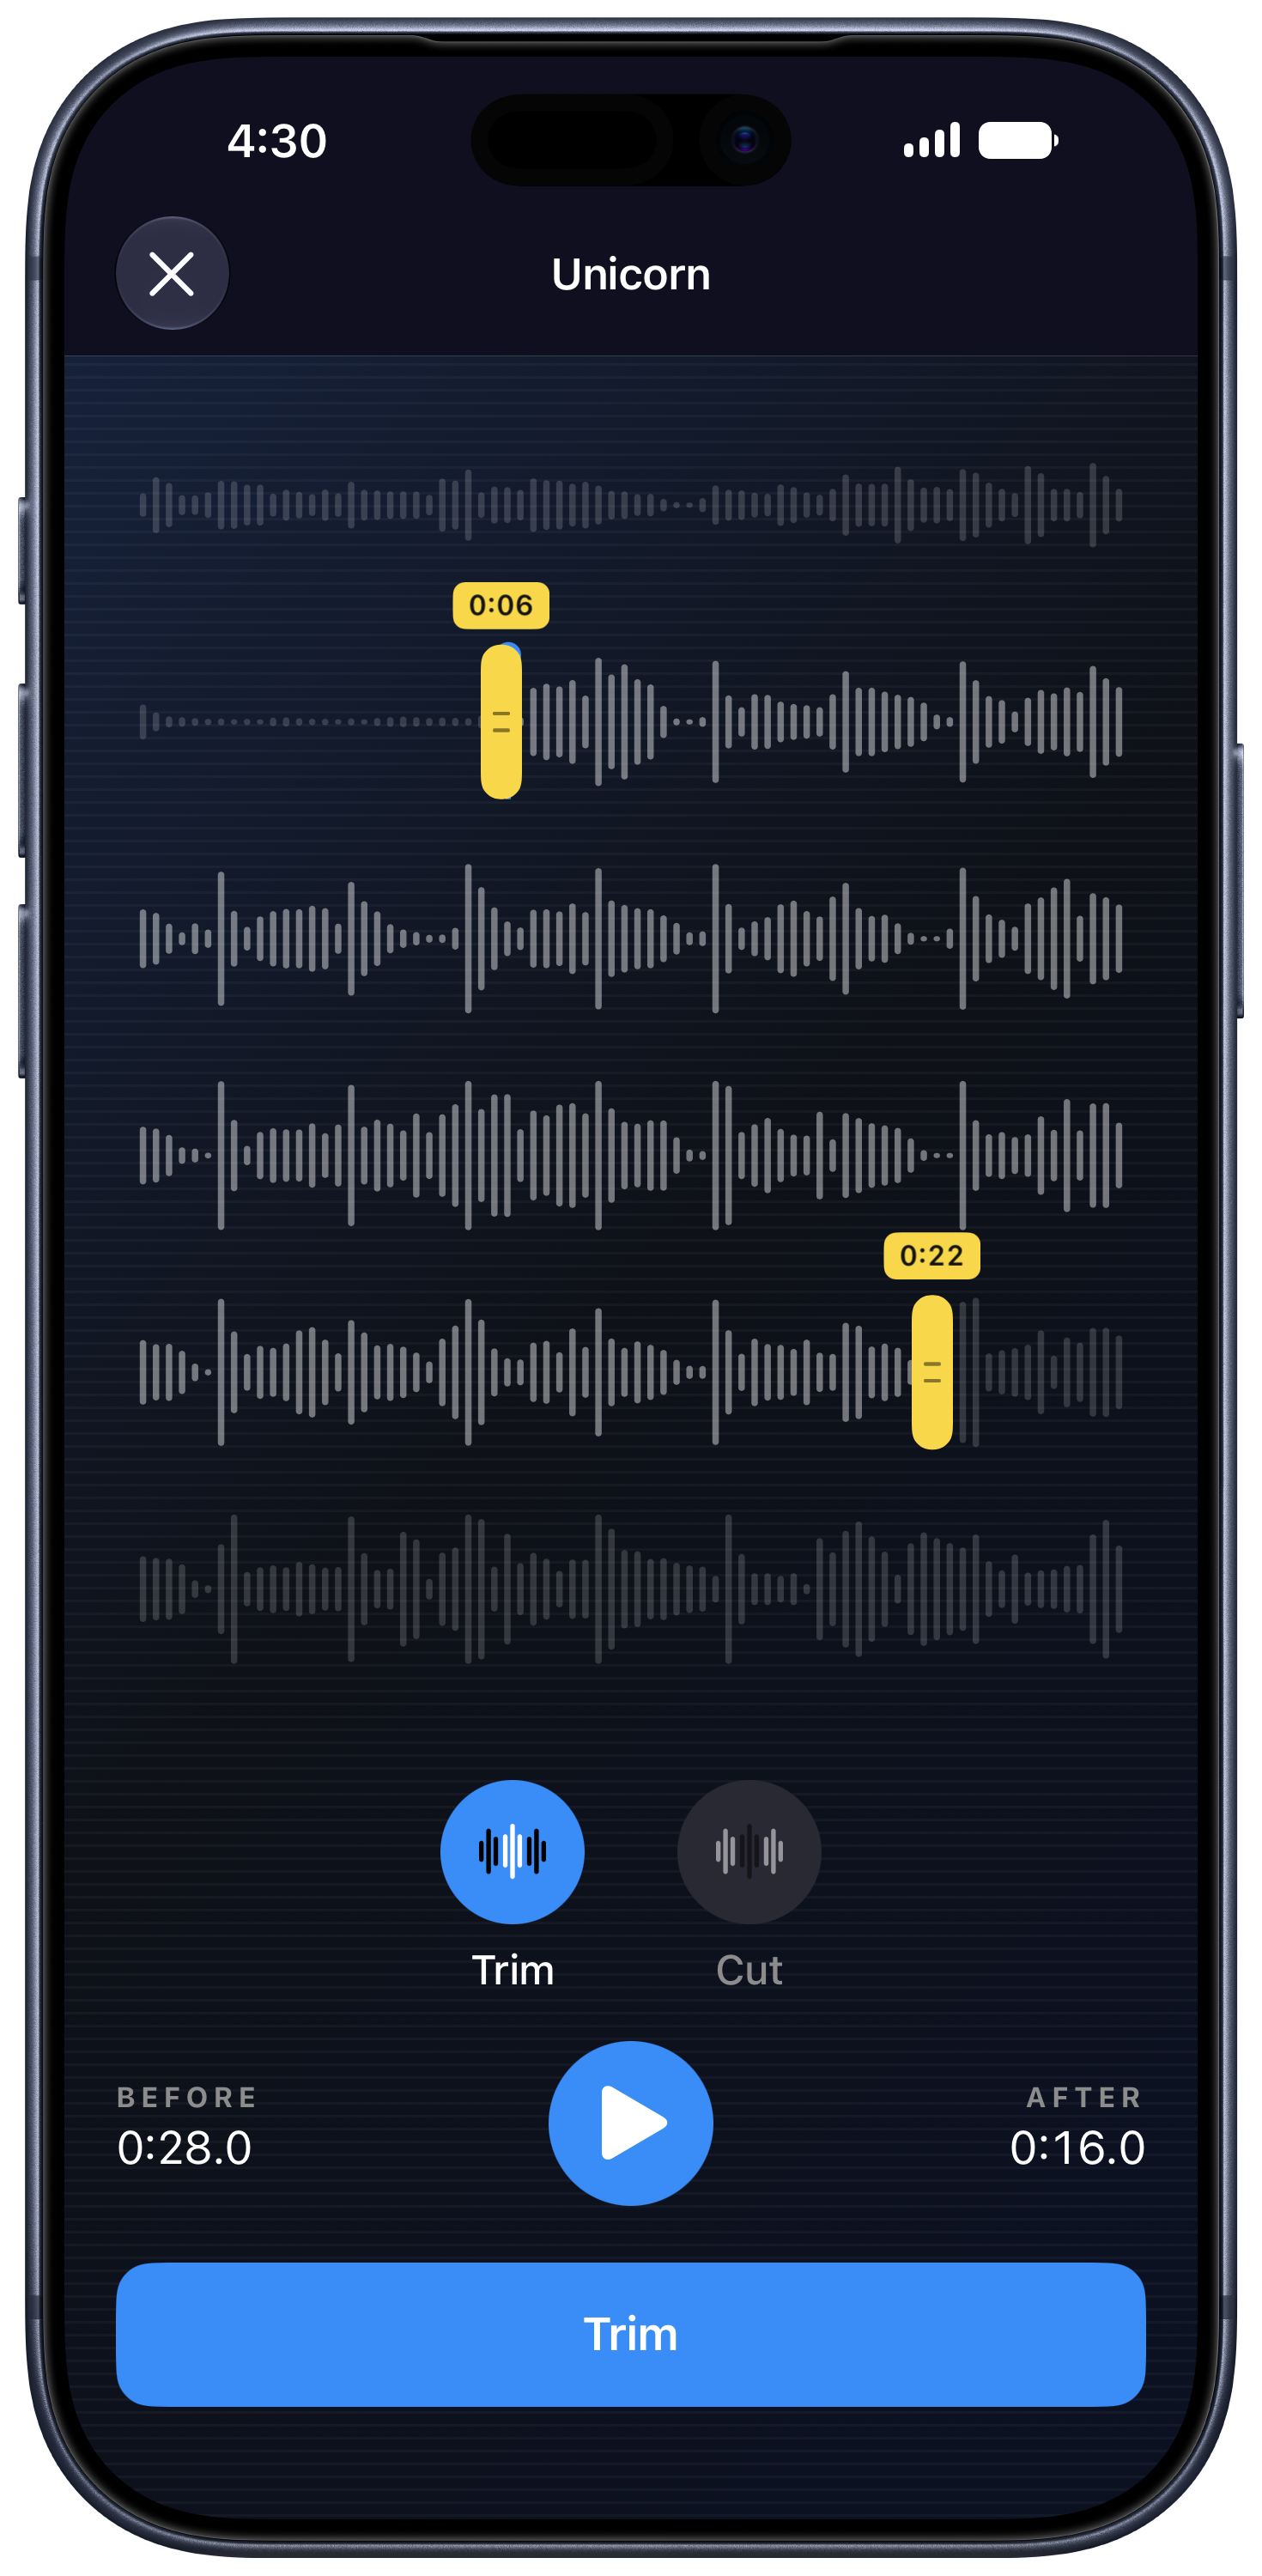
You can preview the result before you commit. When you save, you can either update the recording in place, which moves the earlier version to Recently Deleted so you can restore it, or save the result as a new file and keep the original as it was.
Magic EQ
Magic EQ, in a recording’s edit controls, dials in a balanced sound with a single tap. Quartz analyzes the recording and adjusts the highs and lows to bring out clarity and even out the tone. It’s the fastest way to make a recording sound more polished, and because it’s non-destructive, you can turn it off again if you prefer the original.
Noise reduction
Also in the edit controls, Quartz’s neural noise reduction removes steady background sound, like a fan, a hum, or room rumble, while keeping speech clear. It can make a recording sound like it was made in a much quieter room. There’s a strength control so you can choose how much to apply, from a light touch to a heavy clean-up. The Voice preset uses a moderate amount by default. Note that Quartz’s noise reduction is optimized for speech and may not work well for music or ambient sounds.
Speech transcription
For recordings with talking, switch to the Text tab to turn speech into text. It’s fast and works in over 50 languages, which makes it handy for interviews, lectures, and voice notes you want to read or search later.
Insertion recording
You can record new material straight into an existing recording. Place the playhead where you want to add something, then choose Record From Here to record in at that point. It’s a simple way to patch a section or add to a take without starting over.
Playback
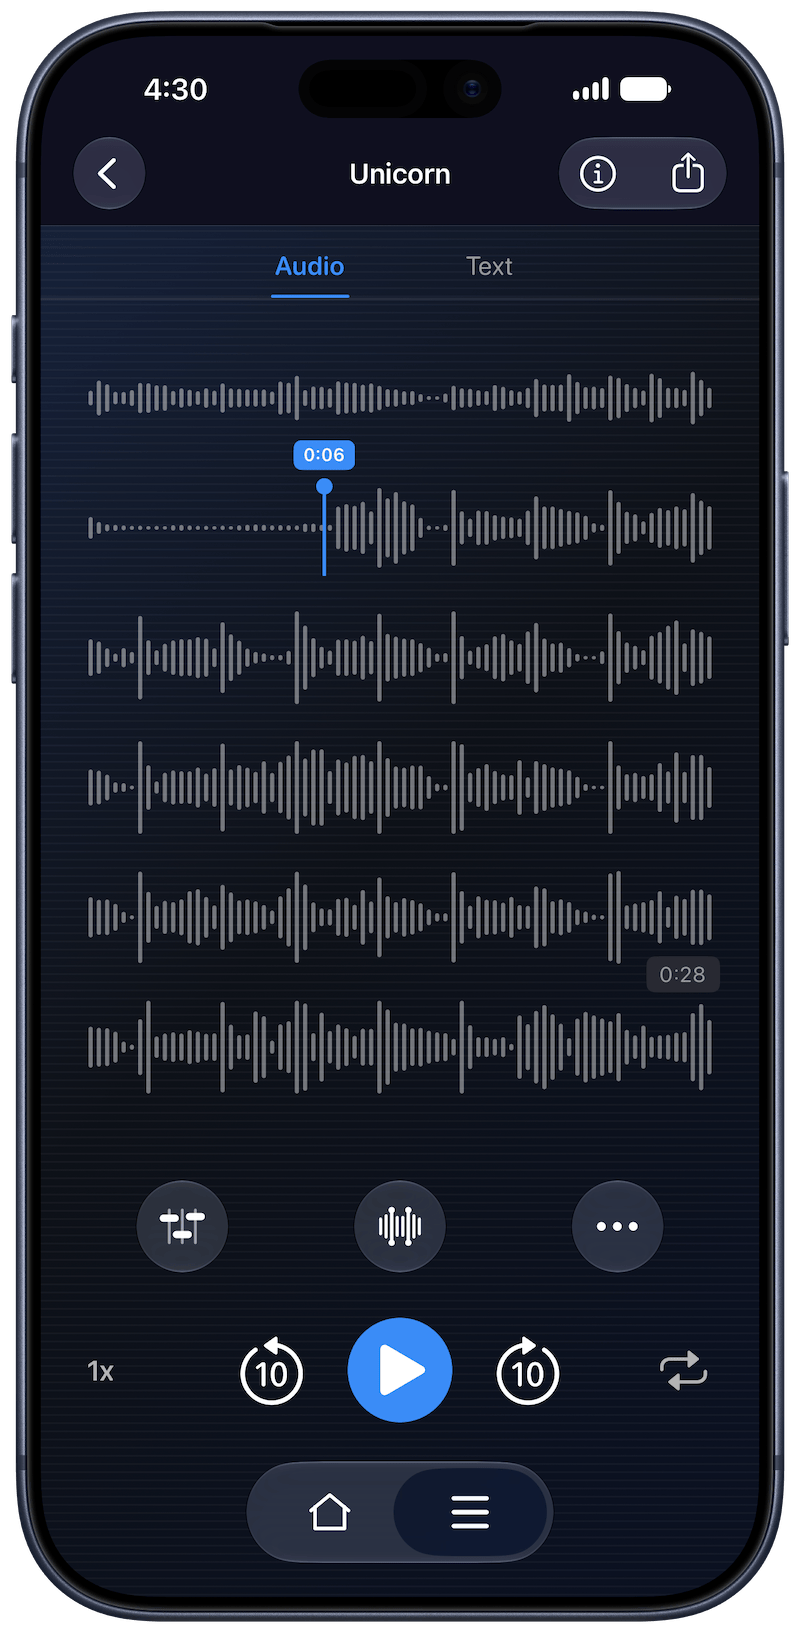
Tap any recording in your Library to open it. This takes you to its playback and editing screen, where you can listen back, scrub through the audio, and make any edits.
Playing a recording
You get play and pause, the elapsed and total time, and a waveform you can drag to scrub to any point in the recording. You can also skip back and forward in ten-second steps, change the playback speed, and loop.
Recently played
Quartz keeps track of what you’ve listened to recently, so getting back to a recording you were just working with is quick. You’ll find Recently Played in your Library.
Organizing Files
As your Library grows, Quartz gives you the tools to keep it in order. Everything lives on your iPhone, and you decide how it’s arranged.
Folders
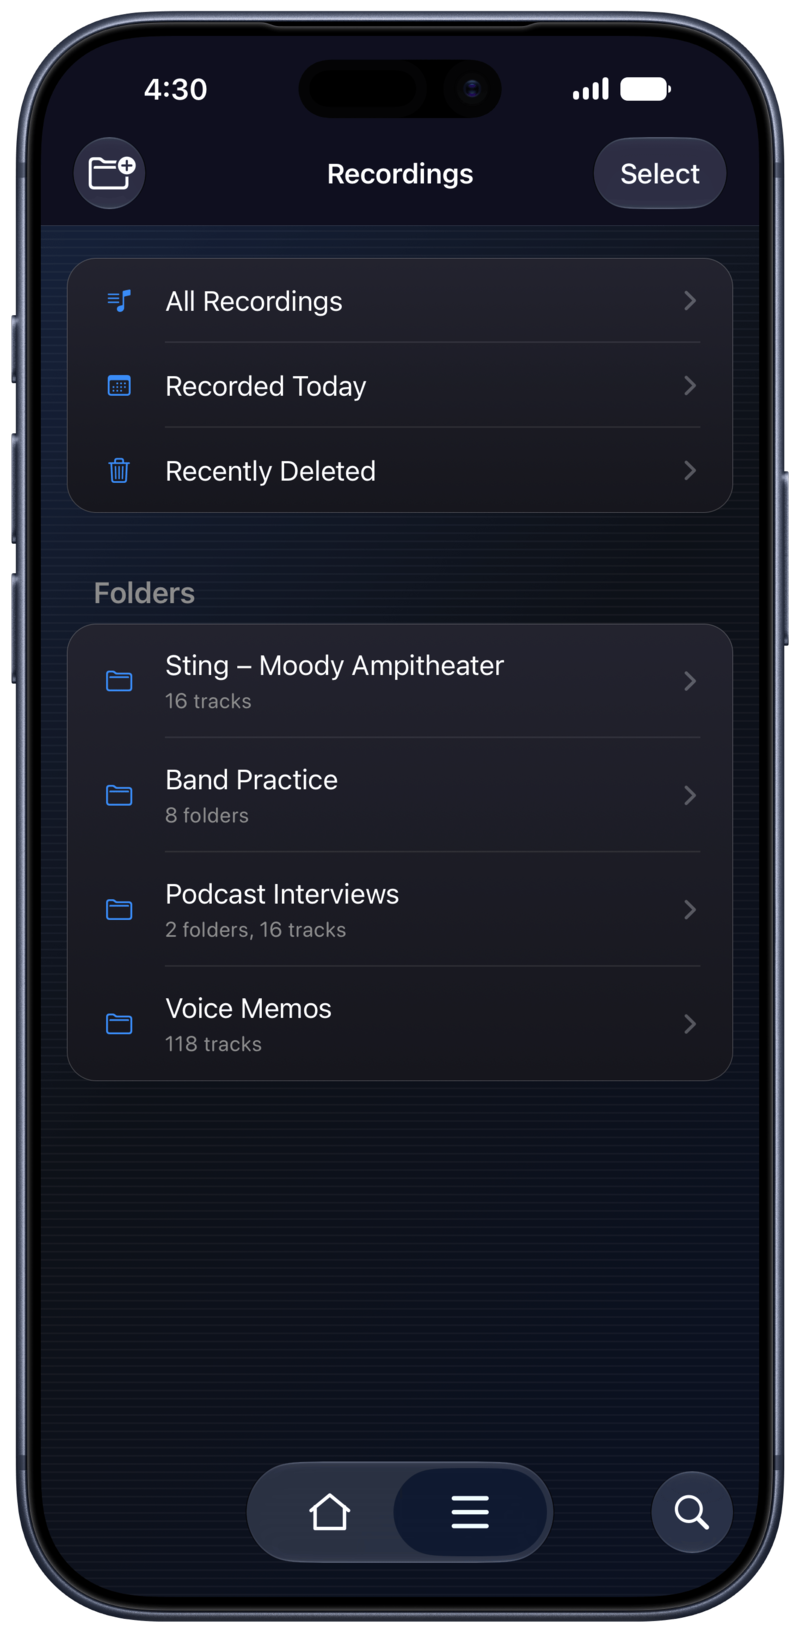
Group related recordings into folders, and nest folders inside other folders when you want more structure. You can create, rename, move, and delete folders freely. To move recordings between folders, use the move option and pick a destination.
All Recordings
The All Recordings view shows every recording you’ve made in one flat list, ignoring folders. It’s the quickest way to find something when you’re not sure which folder it’s in.
Search and sorting
Use search to find a recording by name across your whole Library. You can also change the sort order within a folder, for example by date or by name, to arrange things the way you think about them.
Automatic naming
New recordings are named automatically using the date and time. You can choose the date format and, if you like, have the name include the folder it lives in, which makes recordings easy to identify once you share or export them. These options live in Settings.
Recently Deleted
Deleting a recording doesn’t remove it right away. It moves to Recently Deleted, where you can restore it if you change your mind or remove it for good when you’re sure. Anything left here is cleared automatically after 30 days. Edited-in-place recordings keep their earlier version here too, so an edit is always reversible.
Sharing, Importing, and Exporting
Sharing recordings
To share a single recording, use the share action and send it however you like, by Messages, email, AirDrop, or into the Files app. You can also select several recordings at once and share them together. To hand off a whole folder, export it as a zip, which packages every recording inside into one file.
There are two ways to share files from Quartz:
- As standard recording files — Files in a common audio format such as .wav or .m4a that anyone can open.
- As Quartz packages — Share as a Quartz package when you’re sending to another Quartz user. A package keeps all effects, preset settings, and metadata, and preserves non-destructive editing so the recording stays fully editable. Packages are brought in from Settings › Import Quartz Package.
Importing from Apple’s Voice Memos
You can bring some or all of your recordings over from Apple’s Voice Memos. This is a three-part process: pull the recordings into Quartz on a Mac, save them as a Quartz package, then import that package on your iPhone.
First, on a Mac:
- Download and run Quartz on a Mac, in iPhone compatibility mode.
- Choose Settings › Import Voice Memos.
- Click Choose Folder, then Open.
- From the list, select the Voice Memos folders or recordings you want to import.
The recordings now appear in a folder called “Voice Memos import.” Next, package them up so your iPhone can read them:
- Right-click the “Voice Memos import” folder and choose Share.
- Choose Quartz Package as the share format.
- Choose Save from the share sheet.
- Save the package somewhere your iPhone can reach, such as iCloud Drive.
Finally, on your iPhone:
- Go to Settings and choose Import Quartz Package.
- Navigate to where you saved the package on your Mac.
- Import the package.
Settings
Open Settings from the home screen to fine-tune how Quartz behaves.
Presets & Recording
- Manage Presets — Create, edit, reorder, and hide presets. See Making your own preset.
- Unhide built-in presets — Bring back any built-in presets you’ve hidden.
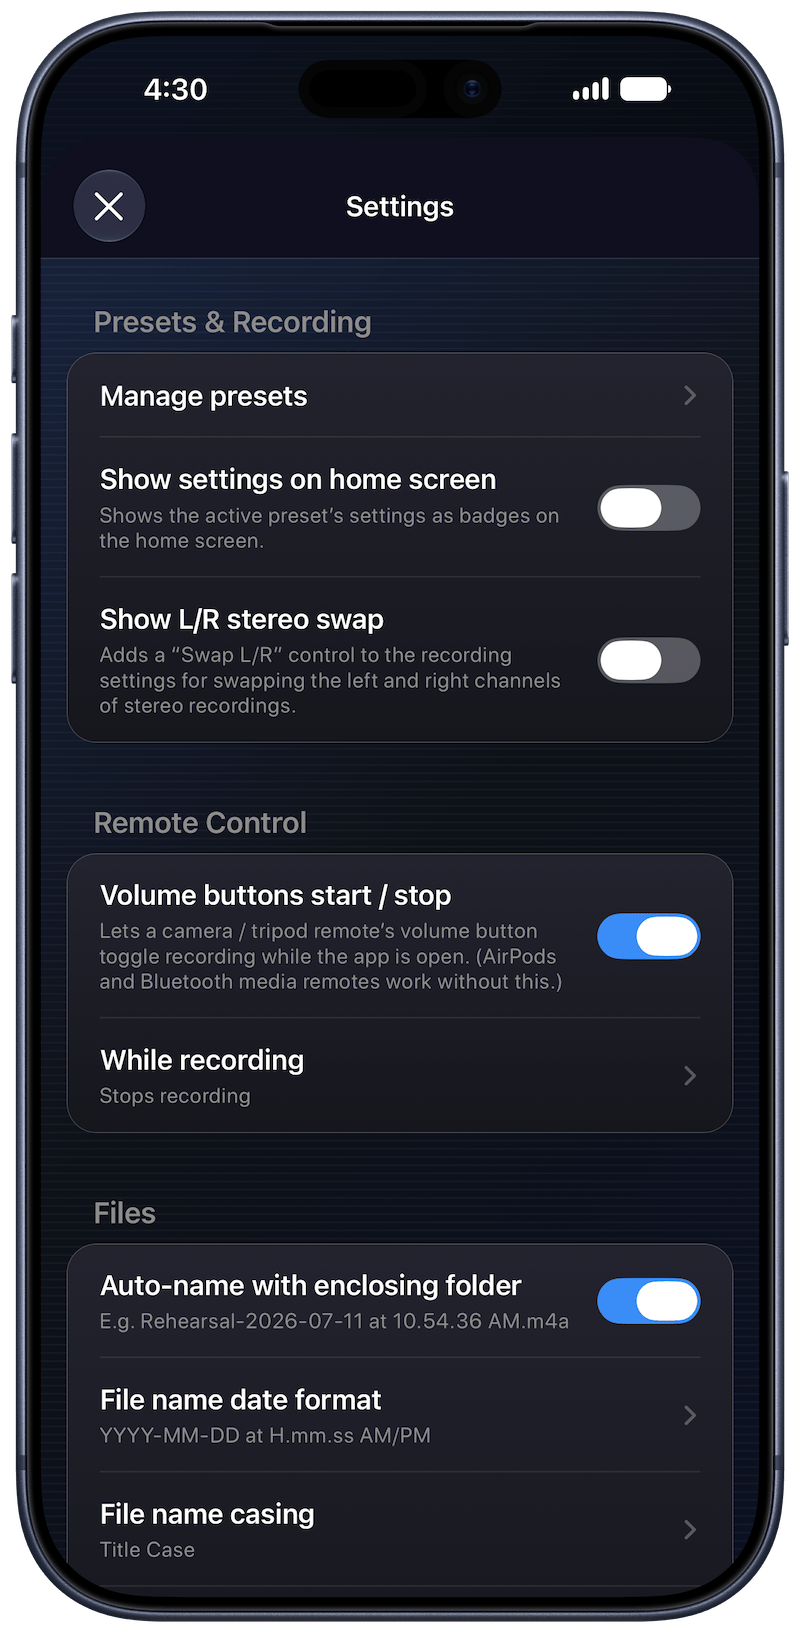
- Show settings on home screen — Displays the active preset’s main settings as small badges on the home screen, so you can see them at a glance.
- Show L/R stereo swap — Adds a Swap L/R control to the recording settings, for swapping the left and right channels of stereo recordings. Useful for some video rigs.
- Mono iPhone recording mic — On iPhones with more than one built-in mic, choose which one to use for mono recordings. Other inputs and stereo recordings aren’t affected.
Remote Control
- Volume buttons start / stop — Lets a camera or tripod remote’s volume button toggle recording while the app is open. AirPods and Bluetooth media remotes work without this.
- While recording — Choose what a remote button press does in the middle of a recording, either stop it or start a new track. This applies to AirPods, Bluetooth remotes, and the volume buttons when they’re enabled.
Files
- Auto-name with enclosing folder — Includes the folder’s name in each new recording’s name.
- File name date format — Choose the date and time style used when naming new recordings.
- File name casing — Sets how names are capitalized as you type them for recordings, folders, and presets.
- Discard short recordings — Automatically deletes recordings shorter than a duration you choose when the recording stops. See Skipping accidental taps.
More
At the bottom of Settings you will find What’s New for the latest changes, Get Help to reach this guide or contact support, Leave a Review, and the Privacy Policy.
FAQ
Where are my recordings stored?
On your iPhone, inside Quartz. There’s no account and nothing is uploaded to the cloud. To get a recording onto another device, share or export it.
Can I change the preset after I record?
Yes. Because processing is non-destructive, you can open a finished recording and change how it sounds, including switching effects or entire presets, at any time.
Does editing change my original recording?
No. Your original is always kept. Edits are applied on top of it, and you can undo or adjust them later. If you edit in place, the earlier version is moved to Recently Deleted so you can restore it. Note that some operations like trim and cut, or recording into the middle of an existing track, move the original to Recently Deleted in case you ever want to go back.
Which preset should I use?
Pick the one whose name matches what you’re doing. Voice for talking, Concert for live music, Field for the outdoors, and so on. You can always change it later.
What’s the difference between the file formats?
Compressed files (m4a) are smaller and great for voice and sharing. Lossless files (wav or caf) keep every detail at the cost of size, which is best for music you plan to edit. A preset chooses this for you, and you can change it.
When should I use lossless recording?
Reach for lossless (wav or caf) when quality matters more than size, like music you plan to edit, master, or archive, since it keeps every detail with no compression. The tradeoff is space. A lossless file is roughly five times the size of a compressed m4a, so for voice notes, interviews, and anything you’ll mostly just play back or share, compressed is the better everyday choice.
When would I want to use the iOS Default preset?
Use it in two cases. First, when you want your recording to sound like Apple’s Voice Memos, since this preset hands the processing over to iOS instead of applying Quartz’s own. Second, when you want stereo from the iPhone’s built-in mic. The other presets record the built-in mic in mono: applying Quartz’s processing means capturing a single channel from one built-in mic, and stereo from the built-in mic relies on Apple’s own processing, which iOS Default lets iOS handle. If you’re using an external mic or interface, this doesn’t apply, and you can record in stereo with any preset.
Can I record in the background?
Yes. Recording keeps going if you lock your phone or switch apps, and a Live Activity on the Lock Screen and Dynamic Island shows that it’s running.
How do I get my recordings onto my computer?
Share a recording by AirDrop or email, save it into the Files app, or export a whole folder as a zip.
Can I import recordings from Apple’s Voice Memos app?
Yes. You can bring over some or all of your Voice Memos recordings with Quartz on a Mac, then import them on your iPhone. See Importing from Apple’s Voice Memos for the full walkthrough.
Why did a short recording disappear?
The Discard Short Recordings setting is on. It automatically removes recordings shorter than the threshold you set. Turn it off or lower the threshold in Settings.
Troubleshooting
Quartz isn’t picking up any sound
First check that Quartz has microphone permission. Open the iOS Settings app, go to Quartz › Microphone, and make sure it’s on. If you’re using an external microphone, confirm it’s selected as the input and that it’s connected properly.
My recording is too quiet or too loud
Watch the level meter before you record. If automatic gain isn’t giving you what you want, switch to manual gain and set the level yourself. For loud sources like live music, make sure the peak limiter is on so sudden peaks don’t distort.
My Bluetooth mic won’t use the preset’s settings
Some Bluetooth microphones and headsets can only record at limited quality. When the input can’t honor everything in a preset, Quartz records at the best quality that input supports and lets you know. For the highest quality, use the built-in mic or a wired or USB microphone.
What happens if I get a call or unplug my headphones mid-recording
Quartz is built to handle interruptions. If a phone call or another audio interruption comes in, or a route change happens like headphones being unplugged, Quartz manages it gracefully so your recording is protected.
My AirPods or volume buttons aren’t controlling recording
AirPods and Bluetooth media remotes work on their own. For a camera or tripod remote that uses the volume buttons, turn on Volume buttons start / stop in Settings. Note that the volume buttons only control recording while Quartz is open on screen.
Support
Still stuck, or have an idea to share? We’d love to hear from you.
Contact Support